Monday, October 22, 2012

No Sew Pillows

Hey everyone!  I know that it has been way to long since I have posted anything but I have a very good reason.  My husband and I just renewed our vows this weekend and we have been very busy.  We did a DIY wedding.  Almost everything was DIY and I will post pictures of everything I did so I can help future brides as soon as I get them back from our photographer.  But today I want to talk about something else.

Not only was our wedding this weekend, but so was my dad's birthday.  So for his birthday, I made him a no sew blanket but I also had enough material left over so I made him a No Sew Pillows.

Here is how I did it.

What you will need:
About 1 yard of 2 different kinds of fleece material
Throw Pillows
What you need
 
What To do:
 
  • Place pillow in between the 2 pieces of fabric.
  • Line up the material as best as possible.  Cut your first corner.  This is easier than a blanket because you just have to cut to the corner of the pillow.


  • Just like the blanket, cut your strips about 1 inch apart.  Continue this until you reach the next corner.  Cut the next corner.


  • Tie this side.  I found it easier to cut each side individually and tie rather than cutting all of the sides.  The reason for this is because the material pulls around the pillow more than it pulls with the blanket.


  • Continue all the way the pillow until you are done.  Congratulations, you have made a no sew pillow. :)


Have a great day everyone and have fun crafting!

Friday, April 13, 2012

The Tank Top Bag

Hey everyone!  Missy here.  It's been awhile since I have done a brand new post but I am glad everyone has enjoyed the onesies I have been making. 


Today I finally finished my new project.  A Tank Top Bag.  I got the idea from a pin on pintrest.com that I saw.  I didn't look at how I made it but I think what I did came out pretty cool.  So I am going to tell you how I did it. 

What you will need:

(Please ignore that pink
fabric, that is what I was
going to originally use)
- A Spaghetti Strap Tank Top (either new, used, or purchased from a thrift store.  Just whatever you have.  I used one of my old ones that no longer fit me)
- Similar color fabric for the inside of the bag (I used a lighter shade of printed purple)
- Contrasting fabric for the binding
- 2 shades of ribbon (i used 7/8 inch and 2 inch ribbon- used from handles and bow)
- Light weight Quilting Batting
- Heat n Bond Lite
- Thread of contrasting or same color.  I used black.
                                            - Iron


  • Turn the tank top inside out and cut along the seams of the sides of the tank on both sides.  Also, if you wish you can cut the straps off as well.  Or if you wish to make them part of the bag, that is up to you.
  • Cut the batting and the fabric for the inside of the bag to the same size and shape of the tank pieces.  (If you want to cut the tank down to have a smaller size bag, that's okay.  This is going to be your purse/bag.  Have fun with it.) 
  • Put all of the pieces together and pin.  Put the batting on the outside, put the batting on the outside, the tank and the fabric wrong sides together. 
  • Sew along the edge of the three pieces and leave about a 1/2 inch around the edge.  Leave a little bit unsewn to be able to turn the piece inside out.  Once turned inside out and finish sewing the piece together.  Repeat with the other piece.


  • Next, I quilted mine with about 2 inch squares, you can do diamonds or whatever you want.
  • Take your binding and sew it to the top of the bag.  It makes it easier to do it prior to sewing the sides together.
    • For the binding for both the top of the bag and around the entire bag, I cut the fabric 2 1/2 inches.  (I had to sew several pieces together to make it long enough)  Fold in half length wise to make the fabric 1 1/4 wide and iron.  Then take the edges and fold in about 3/4 of an inch and iron them.  Place the middle of the binding on the edge of the side you want to put it on
  • Line up the 2 sides of the bag and pin.  Sew together leaving a 'raw' edge.  At this point you should have the tank on the outside.
  • Once you have sew the two pieces together, pin the binding around the edge. Sew around the entire bag.
  • For the handles, cut two pieces of each of the ribbon to the desired length. 
  • On the thinner ribbon, iron the Heat n Bond Lite (walmart.com) on one side.  (This makes it easier to sew the ribbon together.)  Follow the instructions on the packaging.
  •  Leave several inches at each end of the ribbon.  Use the Heat n Bond on each ribbon to secure it to the bag on the outside and inside.
  • Sew the ribbon from the front onto the bag.  First make a square and then an 'X' in the middle of the square to secure the handles. (see the picture below)
  • Once completed, if you desire, embellish how you like.  I sewed a bow on to mine.  To do that, take the wider ribbon and loop it into an '8' shape.  Then take the thinner ribbon, slightly shorter, and make that same shape.  Sew the ribbon together and then sew it onto the bag.  If you wish you can also take the binding and make a button loop and secure a button to one side of the bag. 


Here is my finished product.


Good Size for a possible Beach Bag
Remember, crafting is about what you want to make.  It doesn't have to be perfect (as you can probably tell from mine) it's about having fun and expressing yourself.  If you have anymore questions or need clarification on anything, leave a post or email me.  And as always, Happy Crafting!

Monday, February 27, 2012

It's never too early for Christmas

Missy here again.  It's been a crazy few weeks with my little man getting bigger everyday but I thought that I would make something today that I made throughout my maternity leave.  I know that it is a little early to think about it but my favorite new project is Christmas ornaments. 
I love sparkly, glittery Christmas ornaments but i hate glitter.  It gets everywhere and it seems that you can never get rid of it.  My husband hates it too, so I was glad that I came across these ornaments. 


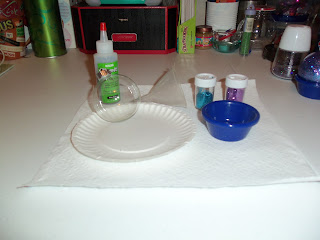
What is needed
Here is what you will need:

Clear Glass Ornaments (Set of 12 at Hobby Lobby for $7.99)
Glitter It! (Glue specifically made for this.   I found this at Hobby Lobby for about $4)
Glitter- any color (for this ornament I used fine, which usually works best, but you can use which ever size works best for you)
Small Dish (I used a ramekin)
Paper Towels
Small Funnel
Plastic Bag


  • Lay down the plastic bag to protect your work surface.
  • Choose the color glitter you would like to use.  You can use whatever you want.  Remember, this is your design.  I used bright blue and purple.  If you are using 2 or more colors, pour the glitter in your small dish and mix them.  Set aside.
  • Take the top off of the ornament and set aside.


  • Pour the glue inside the glass ornament.  Swirl it around until it is completely coated.  Place a paper towel at the top and shake to make sure that you get all over including the opening.  Take the top off of the glue and pour the excess back it to the bottle from the ornament.


  • Place the funnel into the top of the ornament and pour the glitter it.

  • Slowly swirl the glitter around until coated.  Place a paper towel over the opening and shake the ornament to make sure you have all of the ornament covered.

  • Pour the excess glitter back into the small dish.  (If you chose so you don't have to throw out the glitter is purchase a salt shaker at the dollar store and put the glitter in there.  You can add all the glitter you use together and use it for another project.) 


  • Put the top back on the ornament and you are all done.
The Finish Product

More that I did over Christmas.
To make the 'Santa' Ornaments, use fine red glitter and black acrylic paint for the belt and either white or gold acrylic paint for the buckle.

Sunday, February 5, 2012

Cute Onesies

So this morning I got up super early.  My husband and son were still asleep so I decided that I would catch up on my crafting.  Seeing how my sister Cassie is about to have her baby, I thought that i would make her soon to be baby (not allowed to tell the sex yet) a new onesie out of one of my son's old onesies.  I also made my son a new one.  For his I put a tie on his onesie.  This is so simple.  Here is what you will need:

What you will need
A onesie (which ever size your child is in or going to be in.)
Fabric
Fabric Marker
Iron
Heat n Bond Lite adhesive backing (available at any craft store.  I got mine at Wal-Mart for $3)

Trace on to the adhesive
The shape that I used for her onesie was stars.  I started off by cutting out a 2" and 3" star with my Cricut.  If you don't have a cricut, a stencil will do just as well.  Trace the shape to the adhesive backing. 


Place shiney side of the adhesive on wrong side of fabric and place the iron on it at about medium heat (don't use steam), hold there for 8 seconds.  (The instructions are on the back of the package of the adhesive.)

Don't remove the paper backing just yet.  Cut out the fabric with the adhesive and backing still attached.  Once you have it cut out, iron cut out again, only about 5 seconds this time (this is to ensure that it is fully on there.)  Once you have done that, now you can remover the paper backing.
Removing the paper backing from the fabric.

After I ironed the 'tie' onto the onesie.
Place the shiney side of the material down on the onesie. Hold there for 8 seconds. At this point, your fabric should stick to the onesie. Now, if you decided to go with the stronger adhesive, you are done. However if you did choose the Lite (like I did) now you are ready to sew the onesie and the material together.

You can chose either a contrasting color or a matching color thread.  Just follow the edge of the material.  And voila, you have yourself a new onesie.
Cute new onesies.
There you have it.  An inexpensive way to have some super cute onesies.  Have a good day everyone and Happy Crafting.

My son and his Mickey Tie.
The Newest Onesie for my son

Captin America
Sponge Bob
Just in time for St. Patty's Day


For the three above I used the Heat n Bond Ultra so you dont have to sew them on.  Just make sure that they are very secure before you wash them.  With the Captain America fabric, it also has on there Iron Man, and 3 different poses of Spider man.  I made one for each of my sisters and when they can take a picture and post it, they will for me.
Winnie the Pooh